(2) Planning - The Bikes
Both of us have dual-sport bikes already, but I don’t think either of them is right for this trip. Neil has a Kawasaki KLR650 now. That is actually the right bike for the trip, but his bike is thirteen or fourteen years old and I’m just not comfortable taking a bike of that age on this trip. My bike is a KTM 1290 Super Adventure. I really like that bike and have done one 17,000 mile trip around the USA back in 2018 on it. However, it is just too big and heavy for this trip.
I hope that this trip will see us doing a reasonable amount of riding on unpaved roads. Therefore, we will continue with the dual-sport type of bikes that are capable of being ridden on paved highways, gravel roads and trails. The bikes are probably capable of going places that their riders aren’t capable of taking them, especially this rider!
I have purchased two of the new 2022 model KLR650s for us. I have a stock picture of that bike in the gallery section. Unlike the older version of this bike that Neil has the new one is fuel injected rather than carbureted. That will be a huge help as we get into higher elevations. Especially in South America.
The bikes are in the process of being upgraded to fit the requirements of the trip. Some of the mods I just don’t have the facilities to do myself. So I’m having the local dealer in Vancouver do those for me when I drop the bikes off for their scheduled first service. The list of modifications I’ve got planned is below.
Doohicky Upgrade - This is technically the balancer chain tensioner, but all the KLR owners refer to it as the doohicky. There is much debate in the KLR forums as to whether or not this modification needs to be performed. If I was only riding in the US where I had dealers readily available I wouldn’t do it, but for this trip I’m taking the conservative route and having the dealer install it.
Thermo Bob - Again this is technically a radiator bypass modification. The stock KLRs tend to have engine temperatures fluctuate quite a bit during operation. This modification allows for a more consistent engine temp and decreases wear on the engine. At least that’s the theory. It’s another of the modifications that I’m having done at the dealer.
Cogent Dynamics rear shock absorber replacement and front fork upgrades - The stock suspension is adequate on the KLR but for this trip I think that a higher quality setup that is more adjustable for the terrain we will be traveling through is worth the extra cost (about $1,500 per bike). This is the last of the modifications that I’m having the dealer install.
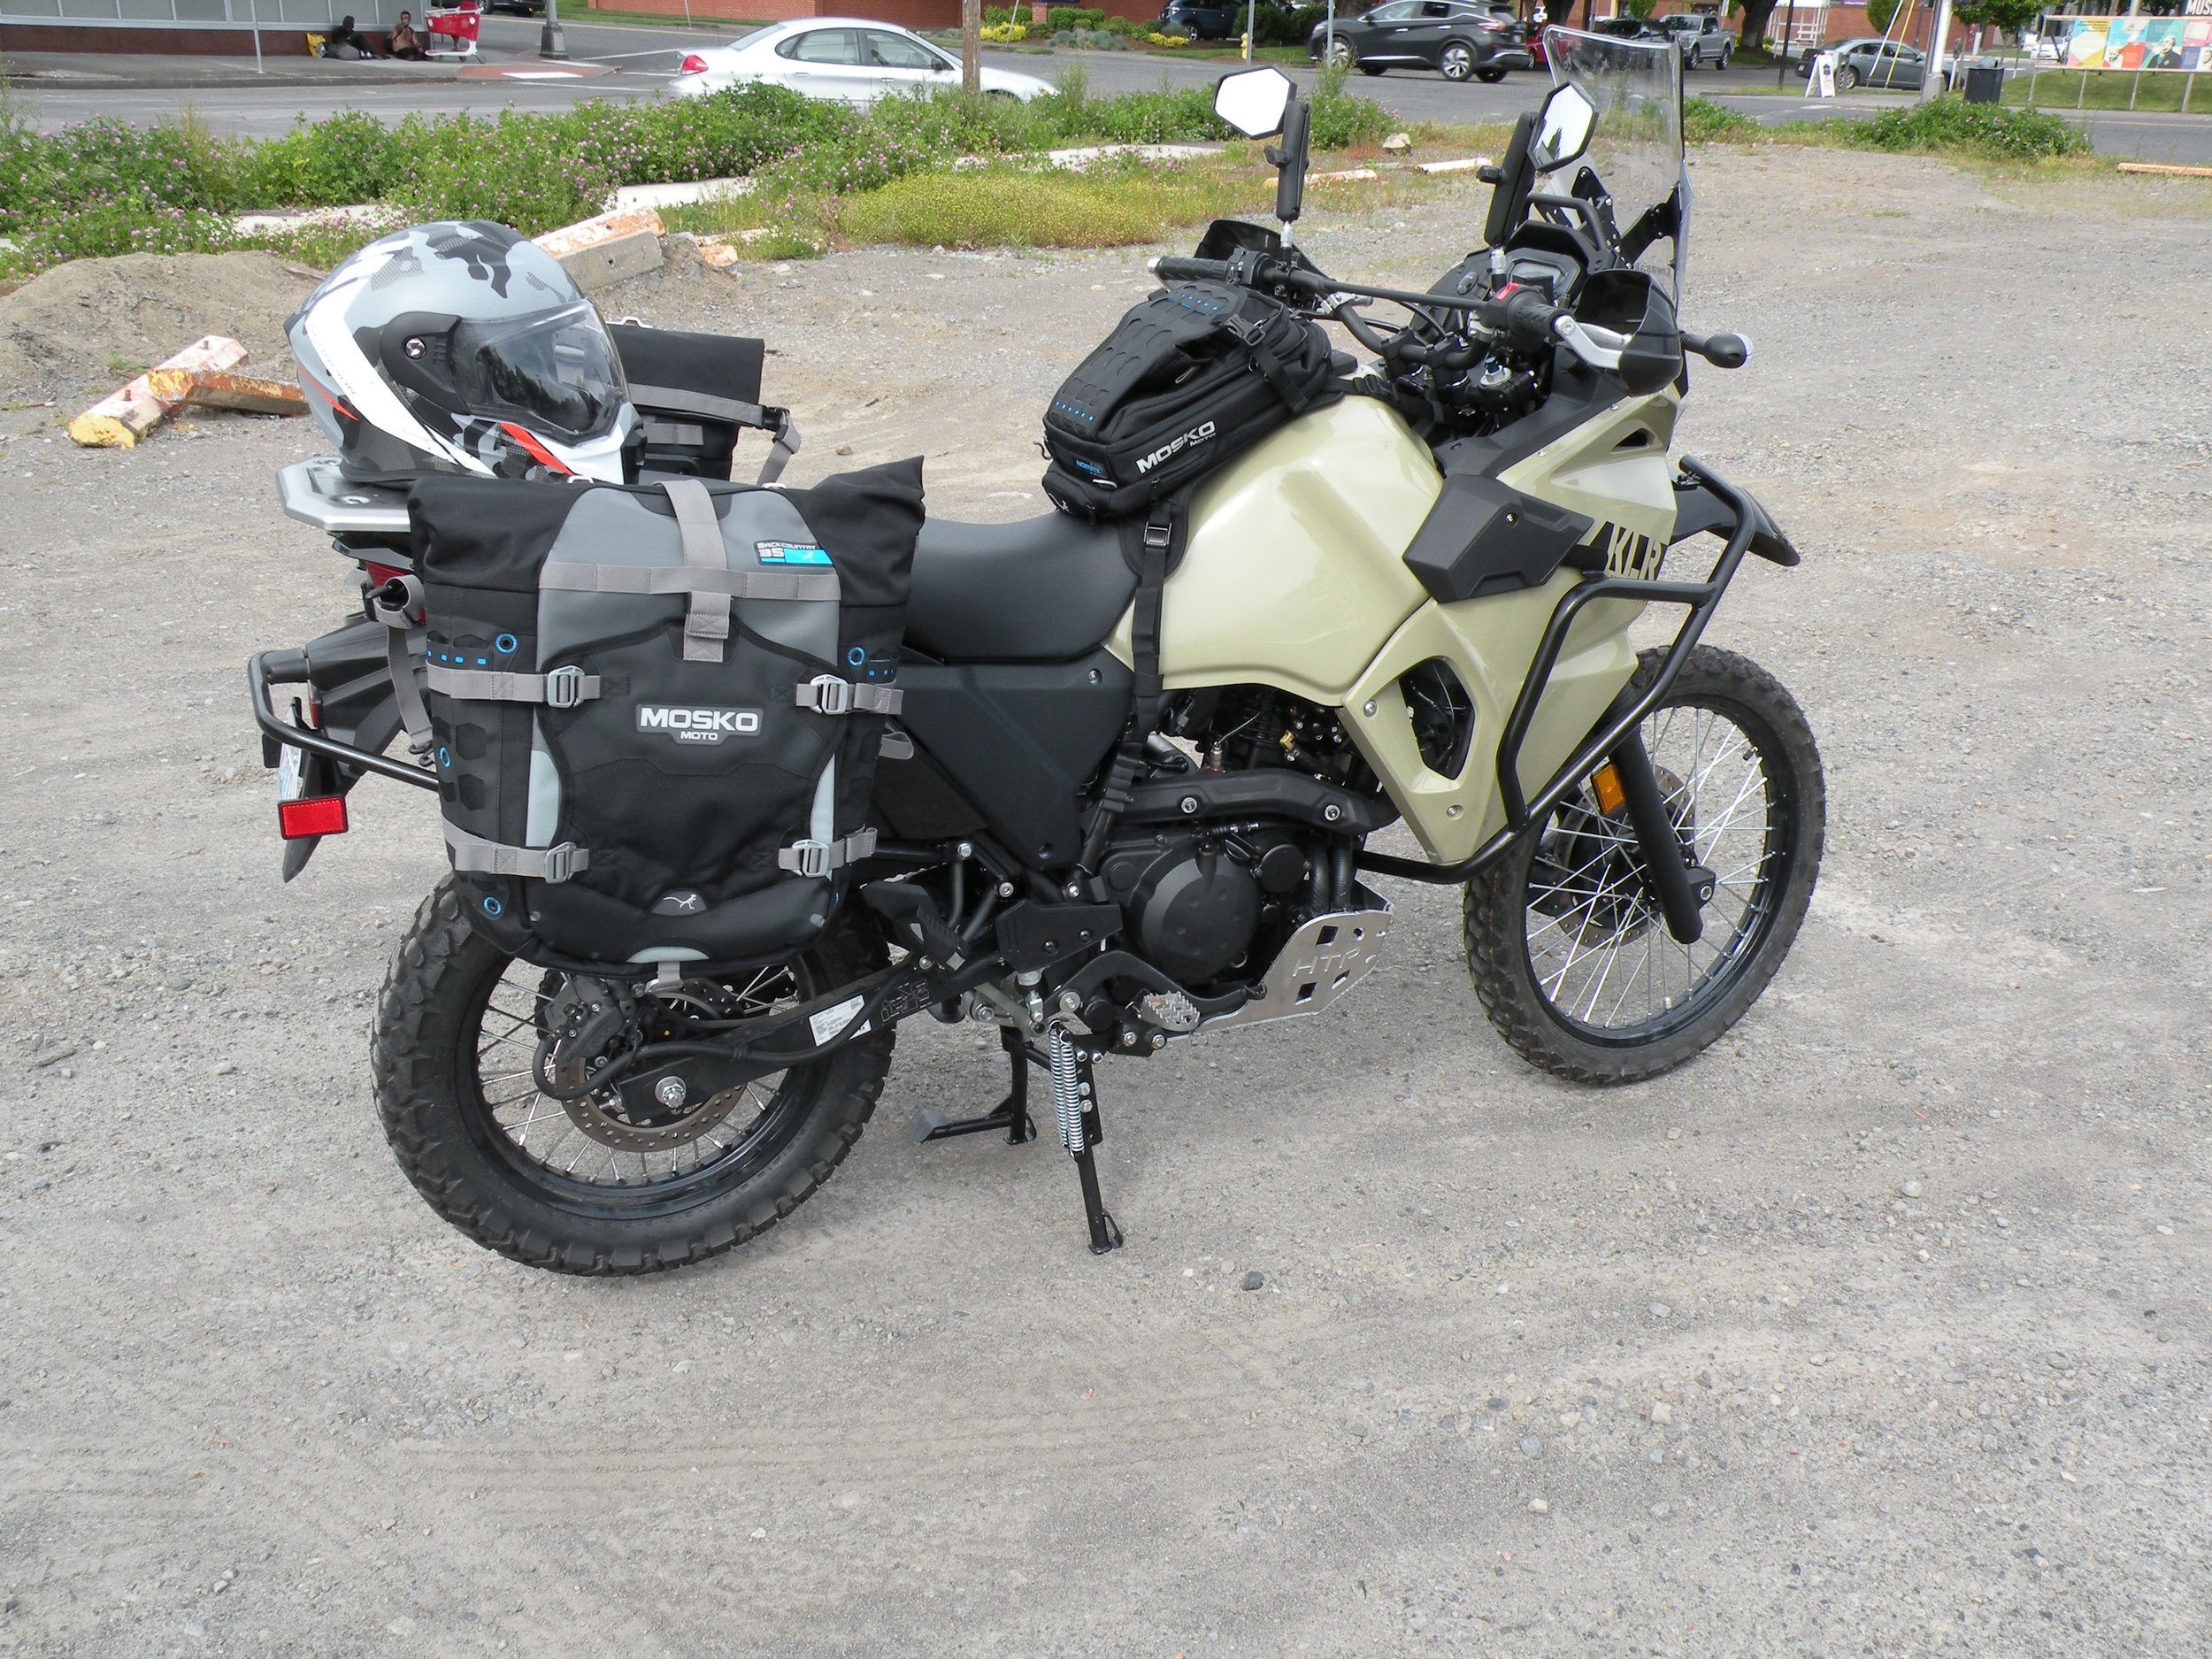
Dirt Racks pannier mounting brackets - I chose a universal rack system that “should” work with whatever pannier system I choose. In the end I had no issues mounting the Mosko Moto soft panniers to them.
Mosko Moto soft panniers and tank bags and - I debated for quite a while whether to go with aluminum hard or fabric soft panniers. In the end I chose the soft ones. I anticipate dropping the bikes now and again on this trip and there are too many horror stories of guys getting leg injuries if it gets caught under the hard panniers in a fall. The hard cases are more secure since they can be locked, but I’ll go with the lessor chance of getting hurt with the softs. As with many of these modifications there is much debate in the riding community about one choice or the other.
Happy Trails skid plate - The skid plate is an engine guard that protects the engine from rocks, etc. when riding and in a fall. The stock skid plate is plastic. I’ve replace that with a heavy aluminum one.
Dirt Racks crash bars - These protect the upper bike (fairing, radiator, etc.) in the case of a fall.
Bark Buster hand guards - The stock KLR hand guards are mainly just wind protection. They are much too flimsy to protect your hands or clutch/brake levers in the case of a fall or getting hit by a tree limb or the like. Nothing will stop you faster than a broken clutch lever!
Doubletake collapsible mirrors - More falling over protection. The stock mirrors are likely to break in a fall. They also cannot be repositioned in cases where you may be riding through brush. These can easily be repositioned or removed if needed.
Happy Trails shift lever - This was fairly cheap and I just decided replacing the stock shift lever with one that it a bit tougher was good insurance.
IMS foot pegs - The stock foot pegs are rubber coated. They tend to get slippery when wet. These are all metal and have a claw design to give very good traction between your boot and the peg so you don’t run the risk of your foot sliding off when standing and riding.
3D Cycle Parts windscreen risers - The KLR isn’t known for having great wind protection. It has a small faring, as it should for the type of riding it’s designed for. These risers just change the angle of the windscreen a bit to help push air over the rider’s head when riding at speed on a highway.
Happy Trails center stand - In my opinion a center stand is a must have for most bikes. It allows you to set the bike in a vertical position, as opposed to leaned over on the kick stand. That means you can remove either the front or rear wheel when needed to fix a flat or perform other road side maintenance.
Trail Tech tachometer and thermometer - For some reason on the 2022 KLR Kawasaki decided to remove the tach and only give you an idiot light for engine temperature. The Thermo Bob upgrade gives me a connection for an aftermarket engine temperature gauge. So I’m adding one. Having no tach is a real issue for me. I really like knowing how many RPMs the engine is turning. While this gauge is not as accurate as one directly integrated to the engine, it’s better than nothing.
OEM 12 volt power outlet - This is the traditional “cigarette lighter” type of plug. I will be bringing along a small air compressor for flat tire repair and they all need this type of power outlet to run. I can also put a USB adapter into it and have USB power for other electrical devices.
Volt Meter, USB Outlet and Switch - In addition to the 12 volt outlet I chose to also install a dedicated USB outlet too. This one is hooked directly up to the motorcycle’s battery and can therefore provide power when the bike is switched off. Charging my phone will not draw enough power to run the battery down and it’s nice to have that option available to me. I bought the parts for this individually and wired it up myself. There is a picture of it in the gallery section.
SW-Motech GPS mount and Garmin Zumo cradle - This will only go on my bike, but it provides a good mount for my GPS.
WHEW! I think that’s it. Neil’s bike is almost completely done. All that needs to be done on it is to install the crash bars, skid plate and USB/Volt meter mods once it comes back from the dealer. I still need to put the miles on my bike to get it ready for it’s first service. I’ll have the dealer do the doohicky, Thermo Bob and suspension upgrades then and mine will be done.
Neil’s bike already to go. Mine is in the shop but I’ll finish out the mods to it when I get it back next week. They will be identical except for color and that mine has a mount for the GPS.
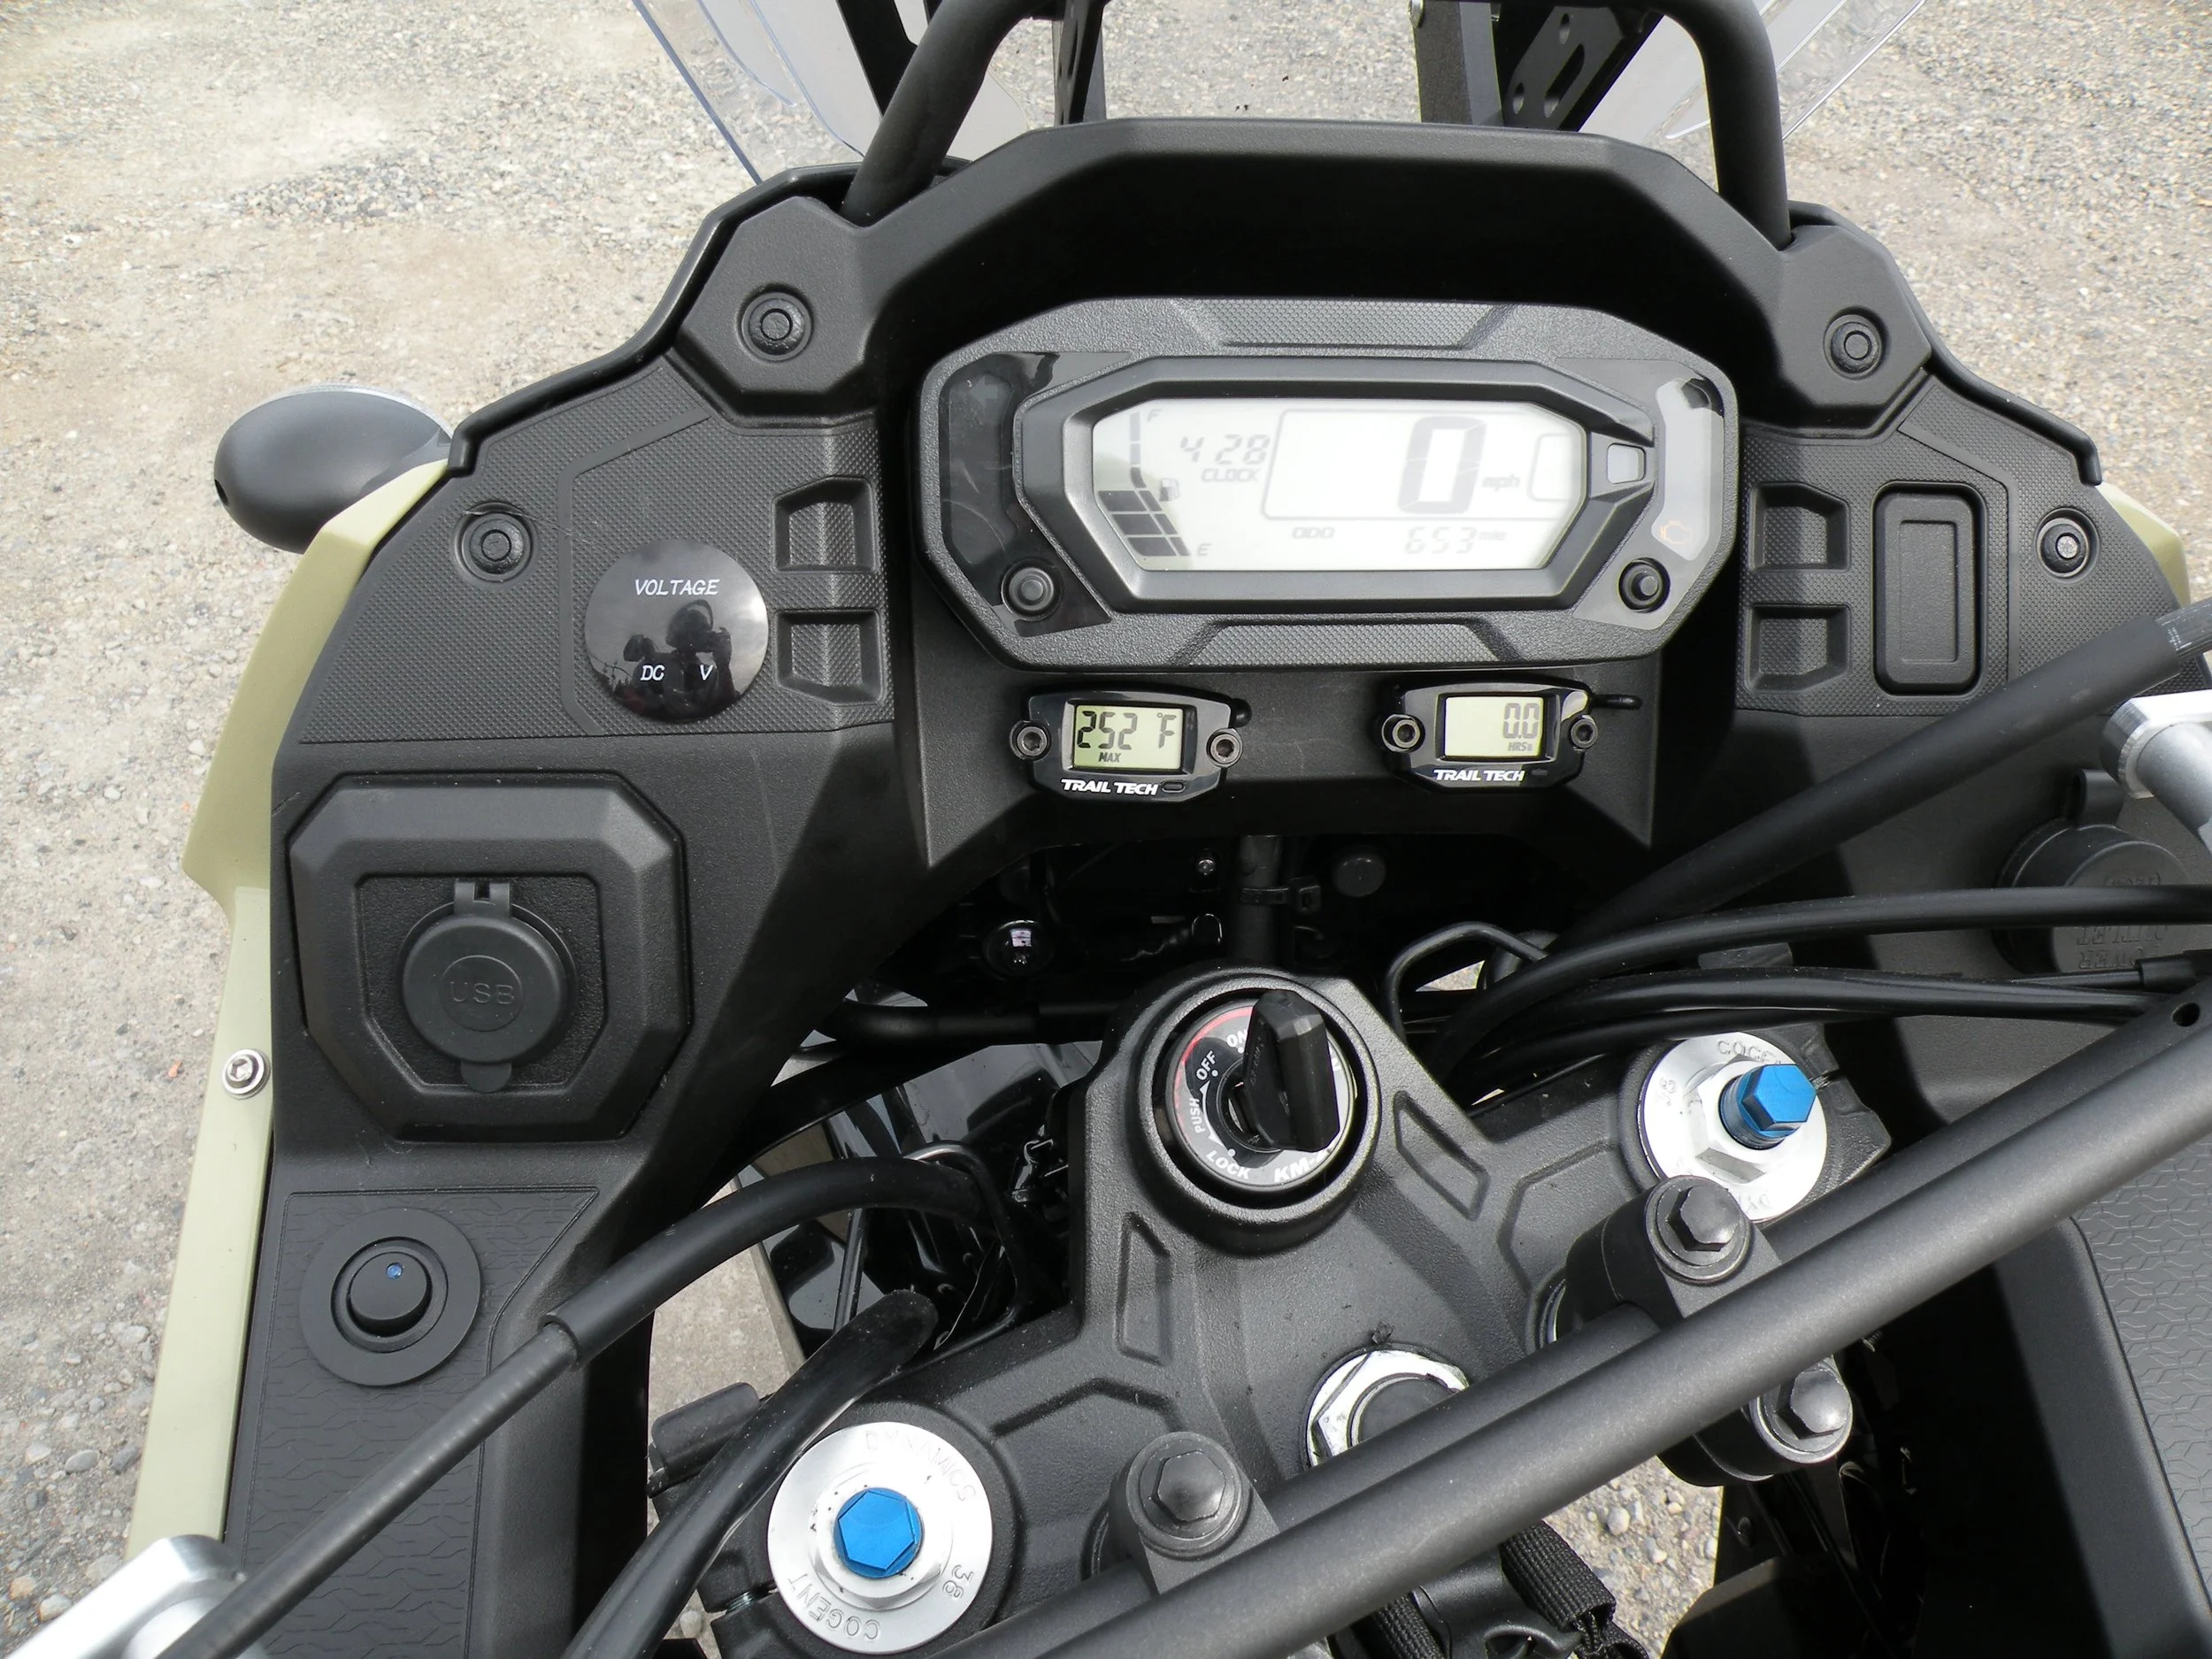
These were all the hard mods to do myself. On the left is the USB port and volt meter. On the right is the 12 volt “cigarette lighter” outlet. In the center are the temperature gauge and the tachometer. I’m not the best with electrical stuff, but managed to get all the wiring down so things work.